1 Compiling an application
OTAWA plug-in provides Worst Case Execution Time (WCET) for embedded real-time applications. As, usually, these applications involves specific processor (different from your own workstation hardware), you have first to generate an application for this specific architecture, that is, called cross-compiling. Naturally, you must get a version of a cross-compiler matching your target hardware. There exists a lot of commercial products but you may also use some free ones like GCC that provides a lot of target architecture. In this tutorial, we are assuming you are using GCC for ARM whose commands are usually prefixed by arm-elf-.
1.1 Creating the project
First, we will create a project on Eclipse platform. OTAWA plug-in may work with any binary found on your disk but an Eclipse project makes it easier to retrieve the application sources.
To create our C project, select the menu File > New > Project ⋯. This will open a New project dialog where you can select the kind of project. Choose C project and perform button Next> Fill name of the project, for example crc, and perform button Finish.
Then, we have to configure cross-compilation options of our project (notice that this type is only performed once for a given project).
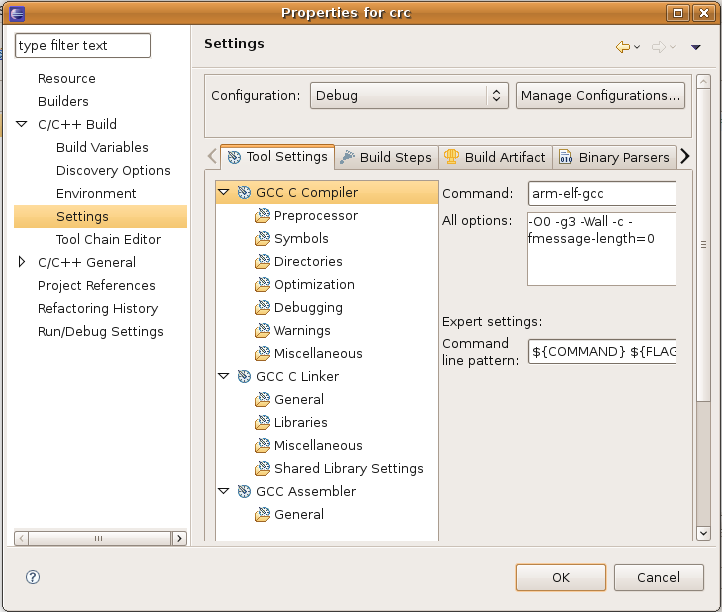
Select the project in the left pane and go to the menu Project > Properties. In Properties for project dialog, select the entry C/C++ Build > Settings.<BR> In tab Tool Settings, there are three fields to configure :
C Compiler
C Linker
Assembler
If you want to compile for an ARM architecture with GCC compiler, the configuration must be:
| Entry | Command |
|---|---|
| C Compiler | arm-elf-gcc |
| C Linker | arm-elf-gcc |
| Assembler | arm-elf-as |
Then perform button Apply then Ok. </p>
NOTE You will have a better visual experience if you are compiling your application with debug flags. Ensure that the field Settings > Tool Settings > Debug Level is set at least to level 1 debugging (-g). OTAWA will be able to make link between your sources and the binary code.
1.2 Compiling the first application
To create our application, we have to add a new Source file in our project.
Select the menu File > New > Source File ⋯. This will open a New Source File dialog where you can select name of file, for example crc.c. Do not forget extension!
Then click on Finish.
You may type any code you want but for the sake of the demonstration, you may copy the following little program:
typedef unsigned char uchar;
#define LOBYTE(x) ((uchar)((x) & 0xFF))
#define HIBYTE(x) ((uchar)((x) >> 8))

unsigned char lin[256] = "asdffeagewaHAFEFaeDsFEawFdsFaefaeerdjgp";

unsigned short icrc1(unsigned short crc, unsigned char onech) {
	int i;
	unsigned short ans = (crc ^ onech << 8);

	for (i = 0; i < 8; i++) {
		if (ans & 0x8000)
			ans = (ans << 1) ^ 4129;
		else
			ans <<= 1;
	}
	return ans;
}

unsigned short icrc(unsigned short crc, unsigned long len, short jinit,
		int jrev) {
	static unsigned short icrctb[256], init = 0;
	static uchar rchr[256];
	unsigned short tmp1, tmp2, j, cword = crc;
	static uchar it[16] = { 0, 8, 4, 12, 2, 10, 6, 14, 1, 9, 5, 13, 3, 11, 7,
			15 };

	if (!init) {
		init = 1;
		for (j = 0; j <= 255; j++) { // 256
			icrctb[j] = icrc1(j << 8, (uchar) 0);
			rchr[j] = (uchar) (it[j & 0xF] << 4 | it[j >> 4]);
		}
	}
	if (jinit >= 0)
		cword = ((uchar) jinit) | (((uchar) jinit) << 8);
	else if (jrev < 0)
		cword = rchr[HIBYTE(cword)] | rchr[LOBYTE(cword)] << 8;
	for (j = 1; j <= len; j++) {
		if (jrev < 0)
			tmp1 = rchr[lin[j]] ^ HIBYTE(cword);
		else
			tmp1 = lin[j] ^ HIBYTE(cword);
		cword = icrctb[tmp1] ^ LOBYTE(cword) << 8;
	}
	if (jrev >= 0)
		tmp2 = cword;
	else
		tmp2 = rchr[HIBYTE(cword)] | rchr[LOBYTE(cword)] << 8;
	return (tmp2);
}

int main(void) {

	unsigned short i1, i2;
	unsigned long n;

	n = 40;
	lin[n + 1] = 0;
	i1 = icrc(0, n, (short) 0, 1);
	lin[n + 1] = HIBYTE(i1);
	lin[n + 2] = LOBYTE(i1);
	i2 = icrc(i1, n + 2, (short) 0, 1);
	return 0;
}
This little program performs CRC computation and is extracted from a classical WCET benchmark called SNU-RT. It is big enough, but not too much, to demonstrate the features of OTAWA. Naturally, you may copy-and-paste this program or type any program you want.
Then, we need only building the project: select the project on left pane and go to menu Project > Build Project. It must remain no more error before continuing the tutorial on next page.