2 Development of Loader
OTAWA supports different API thanks to a plugin mechanism and to an architecture abstraction layer. Developing a loader is mainly providing actual implementation of this layer for a particular ISA.
2.1 The Architecture Abstraction Layer
2.1.1 Overview
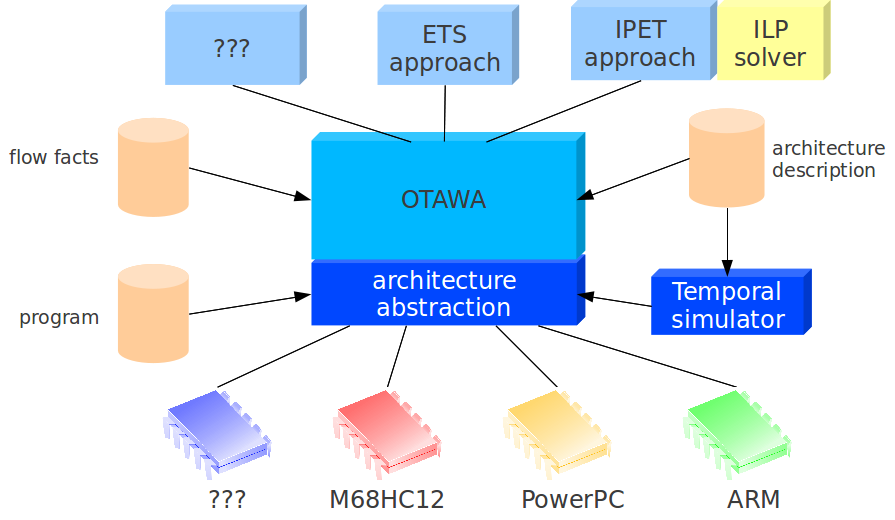
As shown in the figure above, this layer allows to make analysis implemented on OTAWA independent of the actual architecture of the processed program. This does not mean that the analyzes cannot be aware of the particular properties of the processed program but that they do not have to be tuned for a particular instruction (ISA). Yet, the analyzes can have as many information as required from the actual form of the processed program.
The architecture abstraction layer is mainly formed of two parts:
a set of objects describing program image in memory, the files, the symbols and the instructions,
a translator to get semantics of the actual instruction set expressed in a language of semantics instructions.
2.1.2 Abstraction Objects
The UML diagram below describes the classes and the relationship of C++ objects involved in the architecture description layer.

The root class of the architecture abstract layer is the Process that represents the program ready to run in memory. It contains all information about the program in memory (start instruction, platform, file composing the memory image) with other information provided in the executable files like debugging information (matches between source lines and memory addresses). The Process is the root object and the result of a loader work.
In addition, the Process contains also information about the programming model of the architecture thanks to the Platform object: mainly, the list of register banks with their description.
From the Process, one can get the list of executable file composing the program image in memory. Although most OTAWA loader, at this time, only supports applications made of a monolithic executable file, the framework is able to cope with processes made of several file: at least one program file and possibly several library files.
The files, in turn, contains bits composing the program image in memory, called the Segments but also more functional information like Symbol. The Symbol matches any object with a name produced by the compiler, that is, function, data, labels, etc. The symbols may occupy a place in the memory (defined by its address and its size) or not (constants values, compiler or OS internal symbols).
The Segment objects represents slices of memory sharing common properties. They may be initialized or not. Closer concepts from the ELF file format are either sections, or program headers. Whatever, a Segment has usually a name, an address, a size and may be executable or writable. They are composed of ProgItem object.
A ProgItem object represents any atomic entity in the program, mainly, instructions and data items. The current version of OTAWA only supports instructions, Inst class, but next versions may be able to recognize data and add representation objects. Whatever, a program item is identified by its address and its size.
Specializing the ProgItem class, the Inst objects represents the actual machine instructions of the current ISA. The role of these objects is to give an abstract description of machine instructions as precise as possible to let higher level analyzes to work with the instruction. An Inst object have the following interface:
dump - to get a textual representation (useful for debugging or for user output),
kind - information about the nature of the instruction,
readRegs - set of read registers,
writtenRegs - set of written registers,
target - when the instruction is a control, the target of the branch (if one can be determined),
semInsts - translate the instruction into semantics instructions.
The kind allows to identify the type of an instruction whatever the used instruction set. It is composed of a bit vector with each bit giving a specific information:
IS_COND - set if the instruction is conditional,
IS_CONTROL - set if the instruction performs a branch, that is, changes the PC,
IS_CALL - set if the instruction is a sub-program call (ever induces IS_CONTROL to be set),
IS_RETURN - set if the instruction is sub-program return (ever induces IS_CONTROL to be set),
IS_TRAP - set if the instruction performs a system trap like exception or system call (ever induces IS_CONTROL to be set),
IS_MEM - set if the instruction performs memory access,
IS_LOAD - set if the instruction performs memory load (ever induces IS_MEM to be set),
IS_STORE - set if the instruction performs memory store (ever induces IS_MEM to be set),
IS_MULTI - set if the instruction performs multiple memory accesses of the same type (ever induces IS_MEM to be set),
IS_INT - set if the instruction handles integer,
IS_FLOAT - set if the instruction handles floats,
IS_ALU - set if the instruction performs arithmetic or logic operations,
IS_MUL - set if the instruction performs multiplication operation,
IS_DIV - set if the instruction performs division operation,
IS_SHIFT - set if the instructions performs shift operation,
IS_INTERN - set if the instructions performs operation internal to the microprocessor (hardware driving),
IS_SPECIAL - set if the instruction is unusual (often found in old CISC ISA).
A lot of facilities provided by the architecture abstraction layer are optional and the analyzes must be able to handle this: either assuming worst case configuration, or aborting the analysis. Whatever, each information availability is represented by a specific feature put on the Process and included in the WorkSpace:
MEMORY_ACCESS_FEATURE – analyzes can read integer values in the process memory,
FLOAT_MEMORY_ACCESS_FEATURE – analyzes can read float values in the process memory,
REGISTER_USAGE_FEATURE – ensures that lists of read and written registers are available,
CONTROL_DECODING_FEATURE – ensures that the control instruction target is decoded,
SOURCE_LINE_FEATURE – ensures that the source/line debugging information is available,
SEMANTICS_INFO – ensures that the semantics instruction translation is provided,
DELAYED_FEATURE – means that information about delayed control is provided,
SEMANTICS_INFO_EXTENDED - means that the semantics instructions extension is available (multiplication, division, binary operations),
2.1.3 Semantics Instructions
Semantics instructions provides a way to cope with the functional behavior of the instructions independently of the ISA. Basically, the semantic instruction set is a minimal regular instruction set including usual operations with the following features:
the control flow is bound to a forward-branching conditional instruction (no loop can be created),
the memory operations are only performed by two specific instruction, load and store,
the instructions can either use registers, or temporaries (not involved in the program state),
constant values can only be processed through a specific instruction, seti,
the comparison instructions can only produces results based on the usual comparison operators,
as it is impossible, without adding a lot of complexity, to cope with all possible machine instructions, the instruction, scratch, can inform that a result is unknown.
The goal of this language is to make possible data flow analysis of the program, that is static analyzes like abstract interpretation without needing to specialize it to a specific ISA. As such analyzes may have polynomial complexity, the interpretation must be as fast as possible. Hence, the semantics instructions can not create loops (inside the machine instruction they are defining) to avoid to have to compute fix points on the translation of the instruction. The idea is that the machine control flow is viewable inside the instruction but the control flow of the program is handled at an upper level (in the Control Flow Graph for example).
The only conditional instruction, if(c, r, s) allows to have several parallel interpretation paths but no loop. It means that if the condition c is true in register r, the interpretation path continue, else s instructions must be skipped. The misnamed instructions branch or trap means the instruction is performing a branch instruction here, that is, from a CFG point of view, that the branch-taken edge is followed. Finally cont semantic instruction stops the execution of the semantic instruction for the current machine instruction. If no branch has been found on the current execution path, the CFG edge representing sequential control flow is considered to be followed. Notice that branch does not stop the execution of the semantic instruction: from an ISA point of view, it just changes the PC register of the machine.
For computation, the following instructions are available. Most of them works as three-operand operations on register or variable registers with d the destination register, a the first source operand and b the second source operand.
set(d, a) – register copy,
add(d, a, b) – addition,
sub(d, a, b) – subtraction,
shl(d, a, b) – logical shift left,
shr(d, a, b) – logical shift right,
asr(d, a, b) – arithmetic shift right,
cmp(d, a, b) – comparison of a and b,
cmpu(d, a, b) – unsigned comparison of a and b.
If the feature SEMANTICS_INFO_EXTENDED is provided by the process, the following instructions may also be used:
neg(d, a) – sign inversion,
mul(d, a, b) – signed multiplication,
mulu(d, a, b) – unsigned multiplication,
div(d, a, b) – signed division,
divu(d, a, b) – unsigned division,
mod(d, a, b) – signed modulo,
modu(d, a, b) – unsigned modulo,
not(d, a) – bit-to-bit not,
and(d, a, b) – bit-to-bit and,
or(d, a, b) – bit-to-bit inclusive-or,
xor(d, a, b) – bit-to-bit exclusive-or,
2.2 Developing a Loader
A loader is basically a plugin whose handle implements otawa::Loader. The handle object is used to load a binary file and to build the process representing the program. To illustrate the procedure, we will implement (partially) a loader for a MIPS ISA. Let declare the loader handle:
#include <otawa/prog/Loader.h>

namespace mips {

// loader class
static string table[] = { "elf_20" };
static elm::genstruct::Table<string> aliases(table, 1);

class Loader: public otawa::Loader {
public:
	Loader(void): otawa::Loader("mips", Version(1, 0, 0), OTAWA_LOADER_VERSION, aliases)
		{ }
	virtual CString getName(void) const
		{ return "mips"; }

	virtual otawa::Process *load(Manager *man, CString path, const PropList& props) {
		otawa::Process *proc = create(man, props);
		if(!proc->loadProgram(path)) {
			delete proc;
			proc = 0;
		}
		return proc;
	}

	virtual otawa::Process *create(Manager *man, const PropList& props)
		{ return new Process(man, new Platform(props), props); }
};

}	// mips

mips::Loader OTAWA_LOADER_HOOK;
mips::Loader& mips_plugin = OTAWA_LOADER_HOOK;
The more interesting part is in create() method that builds a platform of types mips::Platform and the process itself of type mips::Process. The description of these object is detailed below. When a binary is opened from an ELF file, OTAWA looks for the matching plugin using ISA field of ELF header, install the loader and call method load(). This one creates a process and and load the program in the process. If there is an error, process object is cleaned and a null is returned.
Now, we have to describe the structure of MIPS state in the platform object. First, we have to declare the platform that is mainly composed of registers as a banks of identical register or separate registers:
#include <otawa/hard/Platform.h>
#include <otawa/hard/Register.h>

namespace mips {

class Platform: public hard::Platform {
public:
	static const Identification ID;
	Platform(const PropList& props = PropList::EMPTY): hard::Platform(ID, props)
		{ setBanks(banks); }

	static const hard::Register PC, HI, LO;
	static const hard::PlainBank GR;
	static const hard::PlainBank FPR;
	static const hard::MeltedBank MISC;
	static const elm::genstruct::Table<const hard::RegBank *> banks;

	virtual bool accept(const Identification& id)
		{ return id.abi() == "elf" && id.architecture() == "mips"; }
};

const Platform::Identification Platform::ID("mips-elf-");

const hard::PlainBank Platform::GR("GR", hard::Register::INT,  32, "$%d", 32);
const hard::PlainBank Platform::FPR("FPR", hard::Register::FLOAT,  64, "$f%d", 32);
const hard::Register Platform::PC("pc", hard::Register::INT, 32);
const hard::Register Platform::HI("hi", hard::Register::INT, 32);
const hard::Register Platform::LO("lo", hard::Register::INT, 32);
const hard::MeltedBank Platform::MISC("MISC", &Platform::PC, &Platform::HI, &Platform::LO, 0);

static const hard::RegBank *banks_array[] = {
	&Platform::GR,
	&Platform::FPR,
	&Platform::MISC
};
const elm::genstruct::Table<const hard::RegBank *> Platform::banks(banks_array, 3);

}	// mips
The main point here is that the constructor of MIPS platform must record the hardware register using the setBanks() method. This method takes as input a genstruct::Table, that is, a list of register banks. In the banks array, some may be uniforms like GR or FPR, some are a melt of different registers like MISC. A uniform PlainBank register bank is constructed using its name, its type (one of INT, FLOAT, ADDR or BITS), the size of its register in bits, a format string to name bank register containing a "%d" that will be replaced by the actual register index and the count of registers in the bank.
To declare a register alone (like PC, HI or LO), one has to pass the register name, its type and its size in bits. Non-regular registers are then grouped in MISC. They are passed to the bank constructor as a null-ended list of register pointers.
ID and accept are added here for backward compatibility, to identify the platform, but they are rarely used by OTAWA.
Now the MIPS Process itself may be declared (this is the minimal version):
#include <otawa/proc/Process.h>

namespace mips {

class Process: public otawa::Process {
public:
	Process(Manager *manager, hard::Platform *pf, const PropList& props = PropList::EMPTY);

	virtual hard::Platform *platform(void) { return _pf; }
	virtual Inst *start(void);
	virtual int instSize(void) const;
	virtual File *loadFile(elm::CString path);

private:
	hard::Platform *_pf;
};

}	// mips
The method start() gives the first instruction of the program while loadFile is called by loadProgram() to install the executable file in the current process (copying code and data segments). instSize() provides the size of instruction in bytes if the instruction set is regular, 0 else. This declaration is a very minimal Process, more customization will be added afterward in the following sections to provide more facilities.
To go further in the description of MIPS Process, a loader library must be chosen and used. The following section gives the implemetation using the GEL library (GEL is delivered with OTAWA).
2.2.1 Developing a loader with GEL
GEL is the usual library used by OTAWA to handle ELF binaries. It is a C library but it is perfectly compatible with OTAWA C++. The very first method that will use GEL is loadFile() so we extend our process description with data structure useful for GEL:
#include <gel/gel.h>
#include <gel/gel_elf.h>
#include <gel/image.h>
#include <otawa/prog/Segment.h>

namespace mips {

class Process: public otawa Process {
public:
	...
	virtual Inst *start(void) { return _start; }
private:
	...
	Inst *_start;
	gel_file_t *gel_file;
	gel_line_map_t *map;
};

}	// mips
The loadFile() is described now:
File *Process::loadFile(elm::CString path) {

	// (a) Check if there is not an already opened file !
	if(program())
		throw LoadException("loader cannot open multiple files !");

	// (b) create file
	File *file = new otawa::File(path);
	addFile(file);

	// (c) open the binary
	gel_file = gel_open(&path, 0, GEL_OPEN_NOPLUGINS | GEL_OPEN_QUIET);
	if(!gel_file)
		throw LoadException(_ << "cannot load \"" << path << "\".");

	// (d) build the segments
	gel_file_info_t infos;
	gel_file_infos(gel_file, &infos);
	for (int i = 0; i < infos.sectnum; i++) {
		gel_sect_info_t infos;
		gel_sect_t *sect = gel_getsectbyidx(gel_file, i);
		gel_sect_infos(sect, &infos);
		if(infos.flags & SHF_EXECINSTR) {
			Segment *seg = new Segment(*this, infos.name, infos.vaddr, infos.size);
			file->addSegment(seg);
		}
	}

	// (e) initialize symbols
	gel_enum_t *iter = gel_enum_file_symbol(gel_file);
	gel_enum_initpos(iter);
	for(char *name = (char *)gel_enum_next(iter); name; name = (char *)gel_enum_next(iter)) {

		// scan the symbol
		address_t addr = 0;
		Symbol::kind_t kind;
		gel_sym_t *sym = gel_find_file_symbol(gel_file, name);
		gel_sym_info_t infos;
		gel_sym_infos(sym, &infos);
		switch(ELF32_ST_TYPE(infos.info)) {
		case STT_FUNC:
			kind = Symbol::FUNCTION;
			addr = (address_t)infos.vaddr;
			break;
		case STT_NOTYPE:
			kind = Symbol::LABEL;
			addr = (address_t)infos.vaddr;
			break;
		default:
			continue;
		}

		// build the label if required
		if(addr) {
			String label(infos.name);
			Symbol *sym = new Symbol(*file, label, kind, addr);
			file->addSymbol(sym);
		}
	}
	gel_enum_free(iter);

	// (f) find sart point
	_start = findInstAt(Address(infos.entry));
	return file;
}
This method is the more complex part of the loading procedure as it opens the binary and examine it to build the OTAWA program representation. For the sake of simplicity, the presented version accepts in the process only one binary, the main program, but OTAWA is designed to support shared libraries also. So the first block of code (a) ensures there is no other program opened.Block © create the file itself and at it to the process. Block © uses GEL to open the binary file and stores the handle in gel_file. This handle will be used all along the process life and is stored in attributes.
Block (d) looks in the section composing the executable and builds OTAWA Segment for each section that represents a part of the program in memory. ELF contains lots of sections but only some aims to be involved in the execution. Some contains informations on the code like symbols table or debugging sections. Block (e) allows translating symbols in ELF executable as symbols in the process. Notice that only symbols corresponding to an address in the memory are kept. Finally, block (f) retrieve the OTAWA instruction representing the first instruction of the program.
Each time an instruction is accessed, it must be decoded and built as an Inst object. This is usually done by calling findInstAt(). Yet, it is not straight: OTAWA maintains a list of decoded instruction to reduce memory footprint. In fact, the decoding is performed by a call to the segment, containing the instruction (through findInstAt() ), that manages the list of instructions. This will be shown in the next section.
Whatever, GEL provides also access to debugging information of the ELF file. So it may be used to implement SOURCE_LINE_FEATURE as below:
class Process: public otawa::Process {
public:
	...

	Option<Pair<cstring, int> > Process::getSourceLine(Address addr) throw (UnsupportedFeatureException) {

		// build line map
		setup();
		if (!map)
			return none;

		// look for address
		const char *file;
		int line;
		if(!map || gel_line_from_address(map, addr.offset(), &file, &line) < 0)
			return none;
		return some(pair(cstring(file), line));
	}

	void Process::getAddresses(cstring file, int line, Vector<Pair<Address, Address> >& addresses) throw (UnsupportedFeatureException) {

		// build line map
		setup();

		// look for source line
		addresses.clear();
		if (!map)
			return;
		gel_line_iter_t iter;
		gel_location_t loc, ploc = { 0, 0, 0, 0 };
		for (loc = gel_first_line(&iter, map); loc.file; loc = gel_next_line(&iter)) {
		cstring lfile = loc.file;
		if (file == loc.file || lfile.endsWith(file))
		{
			if (line == loc.line)
				addresses.add(pair(Address(loc.low_addr), Address(loc.high_addr)));
			else if(loc.file == ploc.file && line > ploc.line && line < loc.line)
				addresses.add(pair(Address(ploc.low_addr), Address(ploc.high_addr)));
		}
		ploc = loc;
	}

	void Process::setup(void) {
		if(init)
			return;
		init = true;
		map = gel_new_line_map(gel_file);
	}

private:
	...
	struct gel_line_map_t *map;
	bool init;
};
The first function, getSourceLine() returns, if any, source name and source file matching the given address. The second, getAddresses() computes a set of addresses matching the given source file and source line. Both use a call to setup() to obtain the line map. The setup() function simply checks wether an attempt to build the line map has not already been done otherwise it tries to build the line map, that may fail if no debugging information is available.
2.3 Developing a Loader with GLISS2
If GEL is used to build the program image in memory, it does not provide facilities to support instruction set. Instead, OTAWA uses an ISS (Instruction Set Simulatpor) called GLISS. The instruction set is described using an ADL (Architecture Description Language), SimNML for GLISS, and the generator produces what is required to perform the simulation : memory emulator, system call emulator, simulator and, what is specially used by OTAWA, an instruction decoder and a disassembler. Using an ADL like SimNML and a generator like GLISS allows adding user attributes and also generating code to access to these attributes from a decoded instruction. This feature is exploited a lot by OTAWA to obtain information on the semantic of instructions.
Below is an excerpt from a SimNML file describing the add instruction of MIPS ISA:
op add(rd: card(5), rs: card(5), rt: card(5))
	image = format("000000 %5b %5b %5b 00000 100000", rs, rt, rd)
	syntax = format("add $%d, $%d, $%d", rd, rs, rt)
	action = {
		temp = (GPR[rs]<31..31> :: GPR[rs]) + (GPR[rd]<31..31> :: GPR[rt]);
		if temp<32..32> != temp<31..31> then
			SignalException(IntegerOverflow);
		else
			GPR[rd] = temp;
		endif;
	}
The first line identify the instruction with 3 logical parameters, rd, rs and rt then come attribute definitions. The syntax attributes specifies the opcode of the instruction and particularly bits dedicated to encode the parameters. The syntax attibutes defines the assembly form of the instruction. Both previous attributes use a-la printf format string and arguments. Finally, the action attribute provides the semantics of the instruction using an algorithmic-like language. Basically, the information required by OTAWA is fully available in the SimNML but not so easy to extract, particularly about instruction behaviour.
Whatever, SimNML provides a good base for decoding instructions. The first thing to do is to instantiate a GLISS decode inside our plugin and to build the program image in the memory emulation of GLISS. The following modifications are done to our Process class:
#include <mips/api.h>
...

class Process: public otawa::Process {
	...
private:
	...
	mips_platform_t *_mips_pf;
	mips_memory_t *_mips_mem;
	mips_decoder_t *_mips_dec;
};

File *Process::loadFile(elm::CString path) {
	...

	// (g) allocate GLISS resources
	_mips_pf = mips_new_platform();
	_mips_dec = mips_new_decoder(_mips_pf);
	_mips_mem = mips_get_memory(_mips_pf, ARM_MAIN_MEMORY);
	mips_lock_platform(_mips_platform);

	// (h) build the memory
	gel_image_t *gimage = gel_image_load(_file, 0, 0);
	if(!gimage) {
		gel_close(_file);
		throw LoadException(_ << "cannot build image of \"" << path << "\": " << gel_strerror());
	}
	gel_image_info_t iinfo;
	gel_image_infos(gimage, &iinfo);
	for(t::uint32 i = 0; i < iinfo.membersnum; i++) {
		gel_cursor_t cursor;
		gel_block2cursor(iinfo.members[i], &cursor);
		mips_mem_write(_memory,
			gel_cursor_vaddr(cursor),
			gel_cursor_addr(&cursor),
			gel_cursor_avail(cursor));
	}

}
The block (g) obtains all required resources from MIPS GLISS to perform decoding and disassembly while block (h) build the program image in the GLISS memory emulator.
It becomes now possible to decode instructions from memory emulator and to build an OTAWA instruction:
namespace mips {

class Inst: public otawa::Inst {
public:
	inline Inst(Process& process, kind_t kind, Address addr, int size)
		: proc(process), _kind(kind), _size(size), _addr(addr), isRegsDone(false) { }
	virtual void dump(io::Output& out);
	virtual kind_t kind() { return _kind; }
	virtual address_t address() const { return _addr; }
	virtual t::uint32 size() const { return _size; }
	virtual const elm::genstruct::Table<hard::Register *>& readRegs(void);
	virtual const elm::genstruct::Table<hard::Register *>& writtenRegs(void);
	virtual void semInsts (sem::Block &block);

protected:
	Process &proc;
	kind_t _kind;
	int _size;
private:
	elm::genstruct::AllocatedTable<hard::Register *> in_regs;
	elm::genstruct::AllocatedTable<hard::Register *> out_regs;
	mips_address_t _addr;
	bool isRegsDone;
};
The instruction class store very basic information like kind, address and size of the instruction and a reference on the process. Very basic method like kind(), address() or size() or easy to implement from information passed to the instruction constructor. Other information are more complex as obtaining the disassembly of the instruction and required calls to the GLISS API:
void Inst::dump(io::Output& out) {
	char out_buffer[200];
	mips_inst_t *inst = mips_decode(proc._mips_dec, mips_address_t(addr.offset()));
	mips_disasm(out_buffer, inst);
	mips_free_inst(inst);
	out << out_buffer;
}
In the previous code, a decoded handle of the instruction is first obtaine from the address of the instruction. This handle is used to get the disassembled instruction in out_buffer that is displayed on the out stream. To be clean, the handle needs then to be fried.
In fact, the decoding of an instruction works in the same way. But it is performed in a customized Segment class:
class Segment: public otawa::Segment {
public:
	Segment(Process& process, CString name, address_t address, t::uint32 size, int flags = EXECUTABLE)
		: otawa::Segment(name, address, size, flags), proc(process) { }
protected:
	virtual otawa::Inst *decode(Address addr) {
		mips_inst_t *inst = mips_decode(proc._mips_dec, mips_address_t(_addr.offset()));
		Inst::kind_t kind = 0;
		otawa::Inst *result = 0;
		kind = mips_kind(inst);
		int size = mips_get_inst_size(inst) >> 3;
		free_inst(inst);
		result = new Inst(proc, kind, addr, size);
		return result;
	}
private:
	Process& proc;
};
The main work is done in decode() function. As in the previous example, a GLISS instruction handle is obtained and used to collect information on the instruction. The obtained information allows building the OTAWA instruction in the end. Instruction address is part of the decoding call cause by a call ton findInstAt(). Notice that an instruction is only decoded once and then saved by OTAWA in a dedicated structure. The size of the instruction is also a standard information provided by GLISS in function mips_size. It is given bits and so must be divided by 8 to convert in bytes.
Yet, GLISS has not the concept of kind as used by OTAWA. Basically, we need to assign to each information declared in the ADL. According to the instruction, this may be relatively complex as not only the type of instruction is needed but also, sometimes, the value of the parameters. For example, on ARM instruction set, as the PC is like a general purpose register, any instruction assigning it can be considered as a control. Fortunately, GLISS provides custom attributes to help to build kind according the full set of parameters. First, a NMP file (in SimNML) with the definition of the kind must be written; an excerpt of kind.nmp for MIPS is given below:
let NO_KIND		= 0x00000000
let IS_COND		= 0x00000001
let IS_CONTROL	= 0x00000002
let IS_CALL		= 0x00000004
let IS_RETURN	= 0x00000008
let IS_MEM		= 0x00000010
let IS_LOAD		= 0x00000020
let IS_STORE	= 0x00000040
let IS_INT		= 0x00000080
let IS_FLOAT	= 0x00000100
let IS_ALU		= 0x00000200
let IS_MUL		= 0x00000400
let IS_DIV		= 0x00000800
let IS_SHIFT	= 0x00001000
let IS_TRAP		= 0x00002000
let IS_SPECIAL	= 0x00010000

extend add
	otawa_kind = IS_ALU | IS_INT

...
Then, a template file for code generation needs to be written. We name it kind.tpl:
/* Generated by gliss-attr ($(date)) copyright (c) 2009 IRIT - UPS */
#include <$(proc)/api.h>
#include <$(proc)/id.h>
#include <$(proc)/macros.h>
#include <$(proc)/grt.h>

typedef unsigned long otawa_kind_t;
typedef otawa_kind_t (*fun_t)($(proc)_inst_t *inst);

/*** function definition ***/
static otawa_kind_t otawa_kind_UNKNOWN($(proc)_inst_t *inst) {
	return 0;
}

$(foreach instructions)
static otawa_kind_t otawa_kind_$(IDENT)($(proc)_inst_t *inst) {
$(otawa_kind)
};

$(end)


/*** function table ***/
static fun_t kind_funs[] = {
	otawa_kind_UNKNOWN$(foreach instructions),
	otawa_kind_$(IDENT)$(end)
};

otawa_kind_t $(proc)_kind($(proc)_inst_t *inst) {
	return kind_funs[inst->ident](inst);
}
Finally the actual C will be generated with a command like:
gliss-attr mips.irg -o kind.c -a kind -f -t kind.tpl -d "return 0\\;" -e kind.nmp
The only special file in the command above is mips.irg that is available in the generation of the ISS for MIPS by GLISS. This approach may be used also to compute branch address of a control instruction. Let the inconditional branch instruction of MIPS described in SimNML with:
op J(instr_index: card(26))
	image = format("000010 %26b", instr_index)
	target = __IADDR<31..28> :: instr_index :: 0b00
	syntax = format("J %l", target)
	action = { PC = target; }
Now, it is easy to provide a new template like:
/* Generated by gliss-attr ($(date)) copyright (c) 2009 IRIT - UPS */
#include <$(proc)/api.h>
#include <$(proc)/id.h>
#include <$(proc)/macros.h>

typedef uint32_t otawa_target_t;
typedef otawa_target_t (*target_fun_t)($(proc)_inst_t *inst);

/* functions */
static otawa_target_t otawa_target_UNKNOWN($(proc)_inst_t *inst) {
        /* this code should also be used as default value if
        an instruction has no otawa_target field */
        return 0;
}

$(foreach instructions)
static otawa_target_t otawa_target_$(IDENT)($(proc)_inst_t *inst) {
$(otawa_target)
};

$(end)

/* function table */
static target_fun_t $(proc)_target_table[] = {
	otawa_target_UNKNOWN$(foreach instructions),
	otawa_target_$(IDENT)$(end)
};

otawa_target_t $(proc)_target($(proc)_inst_t *inst) {
        return $(proc)_target_table[inst->ident](inst);
}
And the generation command will be:
gliss-attr mips.irg -o target.c -a target -f -t target.tpl -d "return 0\\;"
As target attribute is already available in the original NMP file, we do not add extension fill with option -e.