2 Properties, Features and Instructions
2.1 Low Level Representation of the Program
The analyses on the machine language, including WCET computation, are based on the low-level representation of the program. This representation is built by the loader, the plug-in in charge of a specific ISA but is viewed by the analyses as a set of interfaces hiding the details of the actual architecture. The goal is not to isolate the architecture from the analyses but to provide common interfaces allowing the analyses (a) to be performed whatever the underlying architecture is and (b) to cope with the specific feature of the architecture in a generic way.
This low-level representation is returned by the loader as an otawa::Process object that represents the image of the program during running time. It is made of the content of the executable file and possible libraries but may contain any kind of data relative to the OS or to the ISA. In addition, the otawa::Process provides several facilities to look to bytes in memories, to access meta-information like debugging data and defined symbols, characteristics of the ISA, etc. Yet, the otawa::Process is not returned as is but inside an otawa::WorkSpace that is dedicated to collect the result of the different analyses. For one otawa::Process, several otawa::WorkSpace can exist and contain data of different analyses.
The otawa::Process is made of a collection of otawa::File. They may be listed this way:
    1 using namespace otawa;
    2
    3 WorkSpace *ws = ...;
    4 for(auto file: ws->process()->files())
    5 	// do something with file.
OTAWA intensively uses the enumeration form of for instruction in C++. Therefore, to visit a collection of items in OTAWA, you have just to write:
    1 for(auto item: collection)
    2 	use(item);
In turn, there is one otawa::File for each executable and library file. They contain a collection of otawa::Symbol and of otawa::Segment. otawa::Symbol represents the symbols, variables, functions, constants, labels, etc defined in the file while the otawa::Segment represents memory areas sharing the same properties, basically, readable, writtable or executable.
otawa::Segment as other object representing memory pieces are defined by an address() method, a size() method and a topAddress(), address of the first byte after the area. The otawa::Segment is made of a collection of otawa::ProgItem that represent meaningful items in the memory, code or data. A frequently used specialization of otawa::ProgItem is the class otawa::Inst that represents an instruction.
An otawa::Inst represents any kind of machine instruction and, therefore, provides a complex interface. Basically, an instruction is defined by its kind that provides information on the nature of the instruction. The kinds are defined by an OR'ed combination of constants IS_XXX where XXX being one of COND, CONTROL (CALL, RETURN, TRAP, INDIRECT), MEM (LOAD, STORE, MULTI, ATOMIC), INT, FLOAT, ALU, MUL, DIV, SHIFT, INTERN, UNKNOWN, SPECIAL.
The kind can be obtained with kind() method but also with dedicated isXXX() functions. An instruction provides also the following information:
read registers, method Inst::readRegs()
written registers, method Inst::writtenRegs(),
branch target (for control instruction), method Inst::target().
And can be disassembled by putting it to an output stream:
Inst *inst = ...;
cout << inst << io::endl;
The instruction is the initial source of information to analyse the machine code and can be handled in a lot of different ways. They may receive properties dedicated to some type of architectures to support features not directly supplied by the class.
There are different ways to get an instruction:
otawa::process::entry() – first instruction of the program,
by its address from an otawa:Process::findInstAt() or an otawa::WorkSpace::findInstAt(),
from its container like an otawa::Segment::findInstAt() or otawa::segment::items(),
using the Inst::nextInst() or 'Inst::prevInst() methods that link instruction together.
Yet, one must keep in mind that the content of the segment is dynamic: at loading time, there is no way to know which parts of the segment contain instructions and which parts contain data. This information is found back slightly by following the execution paths or using the symbols provided in the file. To traverse in a consistent way the instructions of a program, the developer must first invoke an instruction decoding analysis with the following command:
lang=c++ ws->require(DECODED_TEXT);
2.2 Adding Information using Properties and Features
In OTAWA, an important part of the analyses aims at building back the structure, data or control of the program. Each analysis computes information that is used by the other one and that completes the understanding of the application. This means that OTAWA computes information items that are linked to the code and data. To preserve this link, the information items may be linked to the program elements using properties: in C++ terminology, most of OTAWA classes inherit from otawa::PropList and support properties.
Basically, an otawa::PropList is a map of pairs whose first member is an identifier and the second is a value. Identifiers are global objects, of type otawa::Identifier, with a name, the type of values it denotes and a default value. Thanks to the ability of C++ to overload common operators, handling the properties is very easy in OTAWA.
The code snippet below declares an identifier named TIME, supporting values of type ot::time (time in cycles) and whose default value is -1. As identifiers are shared between analyses, an identifier is often declared as external in an header file and defined as a global variable in a source file.
p::id<int> TIME("TIME", -1);
To store a property in an otawa::PropList, use the syntax below:
identifier(property list) = expression;
For example, the code below attach to each instruction of the vector v a time according to the instruction kind:
    1 Vector<Inst *> insts;
    2 for(auto inst: insts) {
    3     if(inst->isDiv())
    4         TIME(inst) = 20;
    5     else if(inst->isMul())
    6         TIME(inst) = 5;
    7     else if(inst->isFloat())
    8         TIME(inst) = 6;
    9     else
   10         TIME(inst) = 1;
   11 }
The following syntax allows to get back the value of the property. If the property list does not contain a property matching the identifier, the default value of the identifier is returned.
identifier(proplist)
In the example below, we are computing the total time of the instructions in the vector:
Vector<Inst *> insts;
ot::time total = 0;
for(auto inst: insts)
    total += TIME(inst);
To remove a properties, use the syntax below:
identifier(proplist).remove();
We can also store several instances of the same property with:
identifier(proplist).add(value to add);</p>
If we store several properties with the same identifier, we need an iterator to retrieve all these values:
for(const auto& it = identifier.all(proplist) ) ⋯
For example, the code below allows to display all labels linked to an instruction:
for(const auto& label: LABEL.all(inst))
    cout << label << io::endl;
The properties is an easy to use and a flexible way to store analysis information in the workspace. Consequently, WCET computations requires hundreds of identifiers and properties. As the properties are very versatile, using properties as is would be a cumbersome task as the property user has to check every time if the property is available or not. To alleviate this, the properties must be (1) well documented and (2) grouped in so-called feature. A feature, class otawa::Feature, is a contract between the producer of the feature and the user of the feature that asserts that some properties are consistently set. Before performing an analysis, one has to ensure that the required features are already available. This is one with the method require() of otawa::WorkSpace. If the feature is available, nothing is done; otherwise the analysis associated with feature is invoked. In turn, this analysis may invoke other required analyses. This is what was done in the previous section: the DECODED_TEXT feature1 ensures that the code has been decoded (by launching, if required, the associated analysis):
ws->gt;require(DECODED_TEXT);
This page contains a non-exhaustive list of eatures available in OTAWA.
2.3 Program representation
2.3.1 Labels in OTAWA
otawa::Inst supports three type of labels:</p>
Symbol::ID (non-function and function labels)
These labels are tied to instructions and can be retrieved as usual properties. If LABEL and FUNCTION_LABEL provides only the label name, more information – size, type, etc, about the symbol can be obtained with Symbol::ID that returns an object of type otawa::Symbol.
2.4 Exercise: generating an instruction flow graph
The goal of the exercise is to produce a graphical output of the control flow of the instructions of a function. The output will be textual using the GraphViz language to represents graphs. The figure below shows the graph in textual .dot, to the left, and its graphical display to the right using xdot.py.
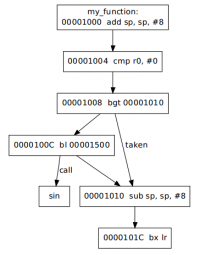
digraph "main" {
    node [ shape=box ];

    "00001000" [ label = "my_function:\n00001000 add sp, sp, #8" ];
    "00001004" [ label = "00001004 cmp r0, #0" ];
    "00001008" [ label = "00001008 bgt 00001010" ];
    "0000100C" [ label = "0000100C bl 00001500" ];
    "00001010" [ label = "00001010 sub sp, sp, #8" ];
    "00001014" [ label = "0000101C bx lr" ];

    "00001000" -> "00001004";
    "00001004" -> "00001008";
    "00001008" -> "0000100C";
    "00001008" -> "00001010" [ label = "taken" ];
    "0000100C" -> "00001010";
    "0000100C" -> "sin" [ label = "call" ];
    "00001010" -> "00001014";
}
The algorithm may split in 5 actions:
gather instructions by following executions paths of the function,
generate the header of .dot,
generate the nodes for each instruction,
generate the edges for each instructions,
generate the footer of .dot.
Step 1 is maybe the more complex and will be based on a working list, todo and on the MARK property as declared below:
todo <- first instruction
WHILE todo != {} DO
	i <- pop todo
	IF not MARK(i) THEN
		add outputs of i to todo
		MARK(i) <- true
		work with i
The resulting program will be applied to the functions of crc.elf. To check the result, you can use the following .
Detailed instructions:
Write a file display.cpp and a Makefile defining an OTAWA application (as done in the previous tutorial).
Add the declaration of the MARK identifier.
Implements the algorithm in the work method (labels and subprogram calls are ignored for now).
Compile all together.
Apply it to the function, icrc1, that does not contain any function call.
Add support for labels and function calls.
Apply it to the function, icrc, that contains function calls.
elm::Vector
otawa::Feature
otawa::File
otawa::p::id
otawa::Inst
otawa::Process
otawa::PropList
otawa::Segment
otawa::WorkSpace
1 The use of this feature requires to include otawa/prog/features.h.